Image Annotation Types: Cost vs Precision, Explained
Bounding box, polygon, semantic vs instance vs panoptic masks, or keypoints? Compare image annotation types by cost, precision, and downstream task.
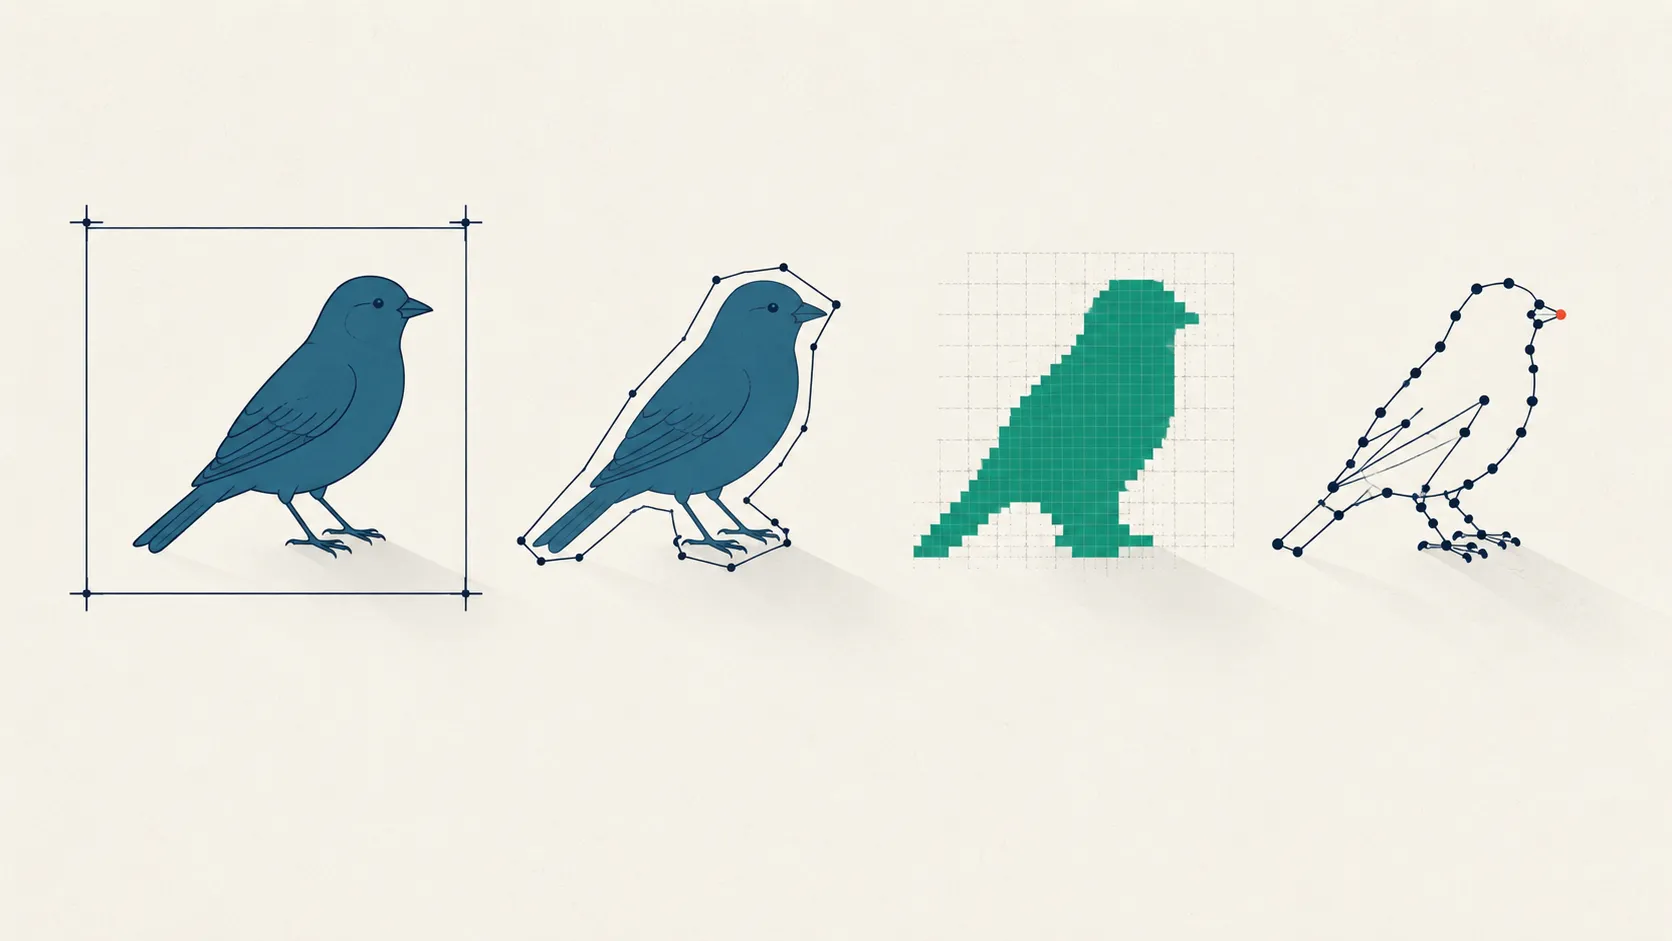
Pick the wrong image annotation type and you either overpay by an order of magnitude or ship labels that can’t answer your question. The choice sits upstream of your model, your budget, and your timeline, yet it usually gets made by whoever opens the labeling tool first. The honest framing is a trade: every annotation type buys you more geometric precision at a higher cost per object, and the right pick is the cheapest one that still supports the downstream task. This guide lines up the main image annotation types on exactly that axis, with the numbers and primary sources to back each call.
What are the main image annotation types?
The main image annotation types are bounding boxes, polygons, segmentation masks, and keypoints, and they form a ladder from coarse-and-cheap to precise-and-expensive. A bounding box is a rectangle; a polygon is a traced outline; a segmentation mask is a per-pixel class map; keypoints are ordered dots on defined parts. Each answers a different question about an image, so the type you pick is really a decision about what your model needs to know.
Segmentation itself splits three ways, which is where most confusion lives. Semantic segmentation labels every pixel with a class but doesn’t separate objects; instance segmentation separates each object but usually ignores background; panoptic segmentation does both at once (Kirillov et al., 2019). Hold onto that distinction, because it drives both cost and what the labels can support downstream.
The reason this matters is economic. Annotation is often the largest line item in a supervised-vision project, and the gap between the cheapest and most expensive type is enormous, not marginal. Drawing a box is a few clicks; a dense pixel mask on a complex scene can take over 1.5 hours per image including quality control (Cordts et al., 2016). Get the type right and you spend that budget only where the task truly needs it.
Image annotation types at a glance: the decision table
Here is the artifact most teams actually want: the annotation types on the axes that decide the choice. Read a row to understand one type; read the last column to decide when to reach for it. The ordering runs from lowest cost and precision at the top to highest at the bottom.
| Annotation type | What you label | Relative cost | Precision | Best downstream task | Use it when |
|---|---|---|---|---|---|
| Bounding box | Axis-aligned rectangle (4 numbers) | Lowest (seconds/object) | Coarse—includes background | Object detection, counting, tracking | You need to find or count objects, not their shape |
| Polygon | Vertices tracing the outline | Medium | Tight 2D outline; misses fine concavities | Instance masks, area, rotated/irregular objects | Shape matters but per-pixel isn't required |
| Semantic segmentation | A class label for every pixel | High (~hour+/image) | Per-pixel, but merges touching objects of a class | Scene parsing, region/coverage measurement | You need pixel-accurate regions, not separate objects |
| Instance segmentation | A separate mask per object | High | Per-pixel and per-object | Counting plus measuring individual objects | You must separate and measure each object |
| Panoptic segmentation | Every pixel: class + instance id | Highest | Complete, non-overlapping label map | Full-scene understanding | You need one coherent map of stuff and things |
| Keypoint / landmark | Ordered points on defined parts | Medium (scales with #points) | Exact at points, nothing between | Pose estimation, landmark geometry | Structure or pose matters more than area |
This table is the whole argument in one screen: precision and cost rise together, so the discipline is to stop at the cheapest row that still supports your task. The sections below unpack each type, and for a medical-imaging framing of the same choices, see our medical image annotation guide.
What is bounding box annotation?
A bounding box is an axis-aligned rectangle drawn around an object, stored as four numbers (two corners, or a corner plus width and height) with a class label. It is the cheapest image annotation type because it captures only extent, not shape, and it is the native input for object detection, counting, and multi-object tracking. Every major detection benchmark, including COCO, ships bounding-box labels as a first-class annotation (Lin et al., 2014).
The cost advantage is real and measurable. The traditional draw-and-adjust method plus quality control runs about 35 seconds per box, while an efficient “extreme clicking” protocol cut that to about 7 seconds with no loss of quality (Papadopoulos et al., 2017). Compare that to the hour-plus a dense mask can demand, and the case for boxes on any shape-agnostic task is obvious.
The limitation is baked into the shape. A box always includes background pixels, it can’t represent an object’s true outline, and it degrades badly for long thin diagonals, heavy occlusion, or crowded scenes where boxes overlap. If two objects sit inside one rectangle, the box can’t tell them apart. When that ambiguity starts to hurt the model, it’s the signal to move up the ladder.
When should you use bounding boxes?
Use bounding boxes when the task is to locate, count, or track objects and their exact shape is irrelevant. Detecting whether a lesion is present, counting cells in a field, tracking a vehicle across frames, or triaging images for a second pass are all box-shaped problems, and paying for masks there is waste. The rule of thumb: if a rectangle answers your question, a rectangle is the right label.
Boxes also make an excellent first stage in a two-pass pipeline. Label everything with cheap boxes, then spend polygon or mask budget only on the crops that matter. This “bounding box vs segmentation” decision is rarely all-or-nothing in practice; the strongest programs mix types deliberately, using coarse labels to route expensive labels to where precision earns its cost.
What is polygon annotation?
Polygon annotation traces an object’s outline with a sequence of vertices, producing a tight 2D boundary that a box cannot. It is the practical middle of the ladder: far more precise than a rectangle, far cheaper than a dense per-pixel mask, and the standard way instance masks are actually authored. COCO’s per-instance segmentations, for example, were collected as polygon outlines around each object (Lin et al., 2014).
Polygons shine on rotated, irregular, or elongated objects where a box wastes most of its area on background, and on tasks that need a usable area or shape estimate without pixel-perfect edges. The cost scales with vertex count: a rough seven-point polygon is quick, while a faithful outline of a jagged object can run to dozens of clicks. They also miss fine concavities and holes, which is exactly where true masks pull ahead.
Semantic vs instance vs panoptic segmentation
Segmentation assigns a class to every pixel, and the three variants differ only in what they separate. Semantic segmentation gives each pixel a class but does not distinguish objects, so three cars parked bumper to bumper become a single “car” region. Instance segmentation gives each countable object its own mask but conventionally ignores amorphous background. Panoptic segmentation unifies the two into one complete, non-overlapping label map (Kirillov et al., 2019).
The organizing idea is the distinction between “stuff” and “things,” which Kirillov et al. (2019) formalized for the panoptic task rather than originated. Stuff is amorphous, uncountable background of similar texture, such as sky, road, or grass; things are countable objects with distinct shape, such as people or cars. Semantic segmentation handles stuff and things the same way; instance segmentation cares only about things; panoptic asks for a class on every pixel plus an instance id on every thing, and introduced the Panoptic Quality (PQ) metric to score that combined output.
All three sit at the expensive end, and the number to internalize comes from Cityscapes: annotating and quality-controlling a single image at fine pixel level took more than 1.5 hours on average (Cordts et al., 2016). That is why teams reserve dense masks for tasks that genuinely need pixel accuracy, such as measuring region area, computing coverage, or training a model where boundaries carry the signal. When you do produce masks, boundary disagreement between annotators becomes its own problem, which is why mask projects lean on overlap metrics like Dice and IoU rather than simple accuracy, covered in our piece on Dice vs IoU vs Hausdorff.
Which of the three to choose follows from the task. Pick semantic when you need pixel-accurate regions but don’t need to separate objects, such as tissue-versus-background coverage. Pick instance when you must count and measure each object individually. Pick panoptic when a downstream system needs one coherent map of the whole scene, stuff and things together, with no gaps or overlaps.
What is keypoint (landmark) annotation?
Keypoint annotation places an ordered set of points on predefined parts of an object, capturing structure and pose rather than region. The canonical example is human pose: the COCO person-keypoint format defines 17 body joints per person, from eyes and shoulders to ankles (COCO keypoint task), and the earlier MPII Human Pose benchmark annotated 16 body joints across roughly 25,000 images (Andriluka et al., 2014). Landmark annotation is the same idea applied to faces, hands, or anatomical fiducials.
Keypoints are precise exactly where they sit and silent everywhere else, which is the point. They cost less than a dense mask because you place a fixed handful of points instead of tracing a boundary, but the cost scales with the number of points and with how hard each is to localize under occlusion. Use them when geometry, angles, or pose drive the task, and when the pixels between the points don’t need a label. For area, coverage, or shape, keypoints are the wrong tool and a mask is right.
How label quality differs across annotation types
Label quality shifts as you climb the ladder, and each type fails differently. Bounding boxes are quick to check but carry a low ceiling on precision and get ambiguous in crowds. Polygons introduce vertex-placement disagreement between annotators. Dense masks are the hardest to get consistent, because two careful people will draw slightly different boundaries on the same fuzzy edge, and that variance compounds across thousands of images.
The practical consequence is that measurement changes with the annotation type. Boxes are usually scored with a coarse overlap threshold, while masks demand boundary-sensitive agreement metrics, since a small edge error can swing a pixel-level score. Budget for a second review pass on masks and keypoints specifically, and define your quality metric before labeling starts, not after. Choosing the tooling for these passes is its own decision; we compare options in CVAT vs Labelbox vs V7 and in the broader roundup of the best data annotation tools.
Does model-assisted labeling change the cost math?
Model-assisted labeling lowers the cost of the expensive types but does not erase the ladder. Promptable foundation models can now turn a click or a box into a candidate mask: Segment Anything was trained on the SA-1B dataset of over 1 billion masks across 11 million images and produces segmentations from simple prompts (Kirillov et al., 2023). In practice a coarse annotation drafts the precise one, and a human verifies.
The pattern holds across the field: the model proposes, and a person accepts, edits, or rejects each result. That compresses the gap between a box and a mask, but it doesn’t remove verification cost, and it introduces a new failure mode where annotators rubber-stamp plausible-but-wrong masks. Treat auto-labeling as a way to shift effort from drawing to checking, not as free precision.
Where does Tagaroo fit: annotation as taxonomy design
Tagaroo is not a computer-vision platform and does not draw boxes or masks; for pixels, use one of the vision tools above. Where Tagaroo is useful is the part of annotation that every modality shares: defining the coding scheme and getting humans to apply it consistently. Choosing an image annotation type is, at heart, the same decision as choosing a labeling taxonomy—how many categories, how granular, and how much precision the question actually needs.
That taxonomy question is well-trodden in text and clinical coding, where curated schemes make the granularity trade explicit. A compact scheme like Ekman’s basic-emotion taxonomy buys speed and high agreement with six categories, while a finer scheme like Plutchik’s wheel of emotions captures more nuance at the cost of more rater disagreement. The parallel to bounding box versus mask is exact: more resolution, more cost, more room to disagree. Tagaroo turns any such scheme into a guided workflow with inter-rater reliability computed as annotators work, which is the same discipline a serious image-labeling program needs.
How to choose among image annotation types
Choosing among image annotation types comes down to one question asked in order: what does the downstream task actually require? Work up from the cheapest type and stop at the first one that supports the model.
- Detect, count, or track objects where shape is irrelevant → bounding boxes. Cheapest to produce and to verify.
- Capture shape on irregular or rotated objects without pixel-perfect edges → polygons. The efficient middle.
- Measure regions at pixel accuracy without separating objects → semantic segmentation.
- Separate and measure each object → instance segmentation; add background as panoptic when you need one complete scene map.
- Estimate pose or geometry from defined parts → keypoints / landmarks.
The practical upshot: precision and cost rise together, so the winning move is to buy the least precision your task can tolerate, mix cheap and expensive types deliberately, and decide your quality metric before the first label is drawn. For the medical-imaging version of this decision, start with the medical image annotation guide; to see the taxonomy discipline applied to structured coding, explore a curated scheme like Ekman’s emotions in Tagaroo.
References
- Lin TY, Maire M, Belongie S, Hays J, Perona P, Ramanan D, Dollár P, Zitnick CL. Microsoft COCO: Common Objects in Context. ECCV 2014. arXiv:1405.0312 · DOI
- Cordts M, Omran M, Ramos S, Rehfeld T, Enzweiler M, Benenson R, Franke U, Roth S, Schiele B. The Cityscapes Dataset for Semantic Urban Scene Understanding. CVPR 2016. arXiv:1604.01685 · DOI
- Kirillov A, He K, Girshick R, Rother C, Dollár P. Panoptic Segmentation. CVPR 2019. arXiv:1801.00868 · DOI
- Kirillov A, Mintun E, Ravi N, Mao H, Rolland C, Gustafson L, Xiao T, Whitehead S, Berg AC, Lo WY, Dollár P, Girshick R. Segment Anything. ICCV 2023. arXiv:2304.02643
- Papadopoulos DP, Uijlings JRR, Keller F, Ferrari V. Extreme Clicking for Efficient Object Annotation. ICCV 2017. arXiv:1708.02750
- Andriluka M, Pishchulin L, Gehler P, Schiele B. 2D Human Pose Estimation: New Benchmark and State of the Art Analysis. CVPR 2014. CVF open access
- COCO Keypoint Detection Task (17-keypoint person format). cocodataset.org
If your annotation problem is structured text or clinical language rather than pixels, Tagaroo turns coding schemes like Ekman’s basic emotions and Plutchik’s wheel into guided, reliability-tracked workflows.
Frequently asked questions
- What are the main types of image annotation?
- The main image annotation types are bounding boxes (axis-aligned rectangles for detection), polygons (vertex outlines that trace an object's shape), segmentation masks (a class label per pixel, split into semantic, instance, and panoptic variants), and keypoints or landmarks (ordered points on defined parts, used for pose and geometry). They trade precision for annotation cost: a box is a few numbers, while a dense pixel mask can take over an hour per image to produce and quality-check (Cordts et al., 2016).
- What is the difference between bounding box and segmentation?
- A bounding box marks only the rectangular extent of an object with four numbers, so it includes background pixels and cannot describe shape. Segmentation assigns a class to every pixel inside the object, giving a precise outline at far higher cost. Boxes suit object detection and counting; segmentation suits measurement and pixel-accurate masks (Lin et al., 2014; Cordts et al., 2016).
- What is the difference between semantic, instance, and panoptic segmentation?
- Semantic segmentation labels every pixel with a class but does not separate objects of the same class, so three touching cars become one 'car' region. Instance segmentation separates each object into its own mask but typically ignores background 'stuff'. Panoptic segmentation unifies both: every pixel gets a class, and every countable 'thing' also gets an instance id, producing one complete non-overlapping label map (Kirillov et al., 2019).
- When should you use bounding boxes instead of masks?
- Use bounding boxes when you need to locate, count, or track objects and their exact shape does not matter, because boxes are the cheapest annotation type to produce and to verify. Switch to polygons or masks only when a downstream task needs shape, area, or pixel-level boundaries, since dense masks cost roughly one to two orders of magnitude more per image (Cordts et al., 2016; Papadopoulos et al., 2017).
- What is keypoint annotation used for?
- Keypoint (landmark) annotation places an ordered set of points on defined parts of an object, such as the 17 body joints in the COCO person-keypoint format or the 16 joints in the MPII Human Pose benchmark, and is used mainly for pose estimation and geometric measurement (Andriluka et al., 2014). It is precise at each point but says nothing about the pixels between points, so it fits structure-and-pose problems rather than region coverage.
Tagaroo builds an annotation tool, so we appear in some comparisons ourselves. How we evaluate tools is documented in our editorial policy.
Keep reading
 Image & Multimodal Annotation
Medical Image Annotation: A Complete Guide for AI Teams
Medical image annotation, end to end: annotation types, who should label, consensus and adjudication, DICOM de-identification, and QA tied to risk.
 Image & Multimodal Annotation
Dice vs IoU vs Hausdorff: Segmentation Metrics Explained
Dice vs IoU, the Jaccard index, and Hausdorff distance compared: formulas, the Dice-IoU identity, and when overlap metrics mislead. See which to report.
 Tools & Comparisons
CVAT vs Labelbox vs V7: Computer-Vision Tools (2026)
CVAT vs Labelbox vs V7 for computer-vision annotation: open-source vs enterprise, auto-labeling, DICOM, and pricing models, compared. See which fits.
Put this into practice
Tagaroo turns any rating scale or coding scheme into a guided annotation workflow—with inter-rater reliability computed as you go.